Hacking my Portable AC
I have a Honeywell portable air conditioner (HJ14CESVWK) that comes with an app to control it over wifi, but the downside is that I have to depend on some remote service to control it, and have an app installed on my phone. Which wouldn’t be that bad usually, but if I’m going to download an app named “Honeywell Air Comfort” and the author is “Jmatek Limited” instead of “Honeywell”, that doesn’t exactly inspire confidence. Not to mention that I don’t know what firmware this AC runs, and it sure hasn’t received any updates in the past couple years either (nor probably ever will again, if it even had any to begin with).
So I’ve had this idea that it’s probably possible with enough effort to reverse engineer the protocol, hack it, and then just somehow man-in-the-middle it to control it that way.. fun idea, but this obviously wasn’t going to happen anytime soon unless the key of their certificate got leaked or some vulnerability in the hashing would be discovered to speed up the process of finding the key. So this idea got shelved pretty much as soon as I had it.
But then I started toying around with Home-Assistant. I started small, replacing my Grafana-based dashboard with the interface in Home-Assistant. Much neater and better looking. Next I purchased some Ikea matter devices, along with a ZBT-2 to connect it all via Matter over Thread. And before I knew it the idea about hacking my AC popped up again.
I did some googling around, and as it turned out, many vendors seem to purchase their service from Tuya, whitelabel it, and re-sell it as their own implementation; and lo- and behold, Honeywell Air Comfort turned out to be Tuya too.
After some more searching around it turned out that it’s often possible to connect these Wi-Fi modules via UART and flash different software onto them; so next up I removed all the covers from the AC until I reached the wifi module, which turned out to be quite easy to do; though do be careful as my AC had its RF-receiver connected to the front plastic panel, and the black top panel also had some cables coming off it.
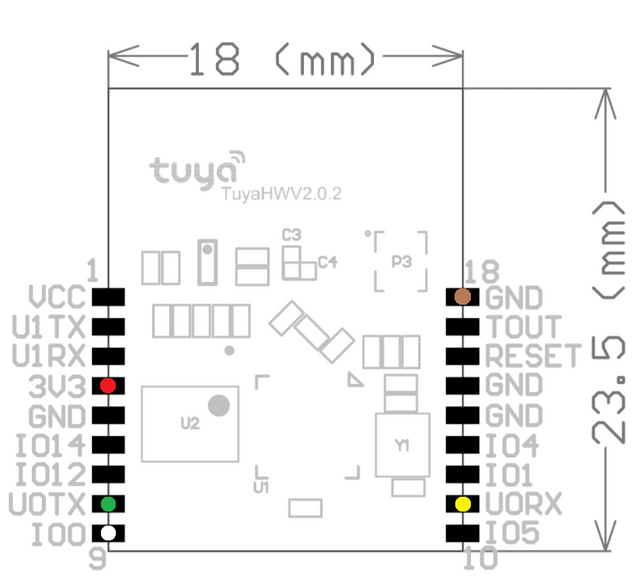
Having all the covers removed I got to my wifi module and saw the model number “TYWE1S” printed on it and eventually I ended up on the Tasmota website with TuyaMCU which has this very helpful guide on how I should solder up my UART to USB adapter, as well as this pinout diagram for my chip.
Now I’ll be the first to admit that though I’m not exactly scared of trying something (if it breaks, oh well); but I don’t have the slightest clue what I’m doing. So I was incredibly happy to have found this forum post by a different community member that goes by the nickname Murder3D showing how he wired it up, and how it ended up working for him.
I’ll spare you my soldering skills (but nothing a good bit of hot glue won’t fix) and tucked it all back into the casing that the wifi module was in originally.
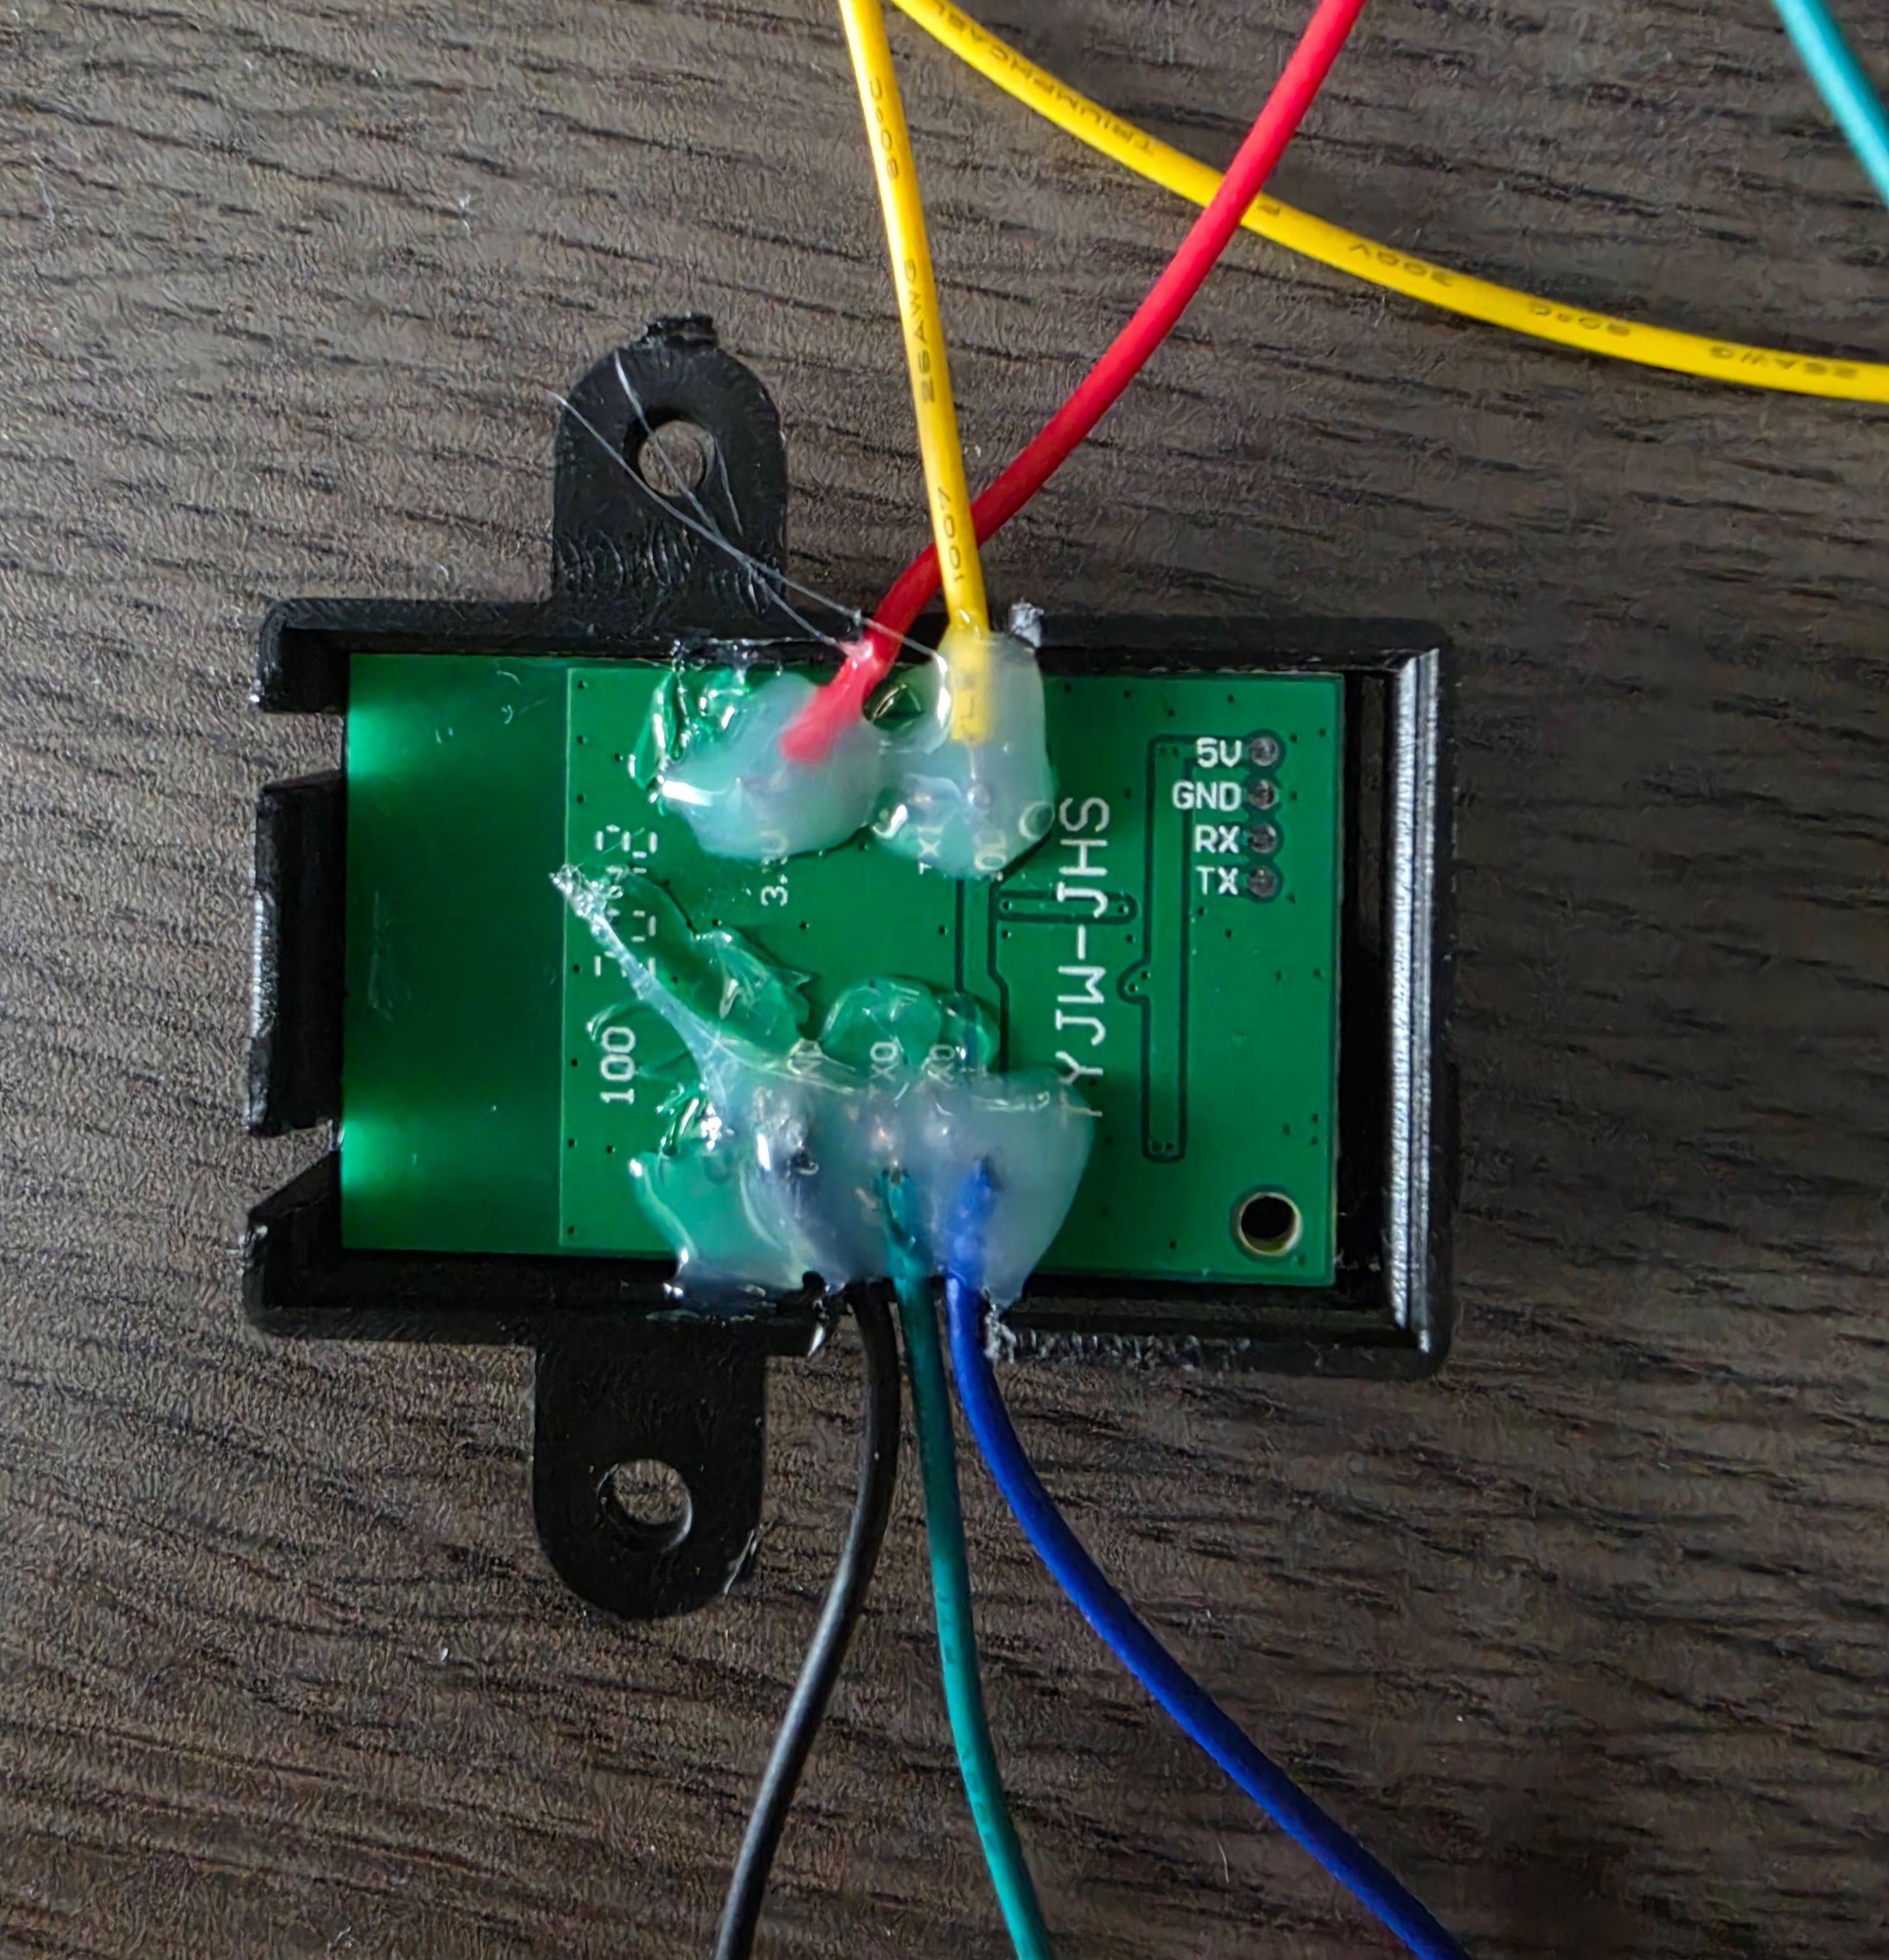
Having the wires soldered onto it I drilled a hole through the top of my AC and routed the cables through there, so I’d be able to connect the UART cable whenever I needed even when the AC is closed back up.
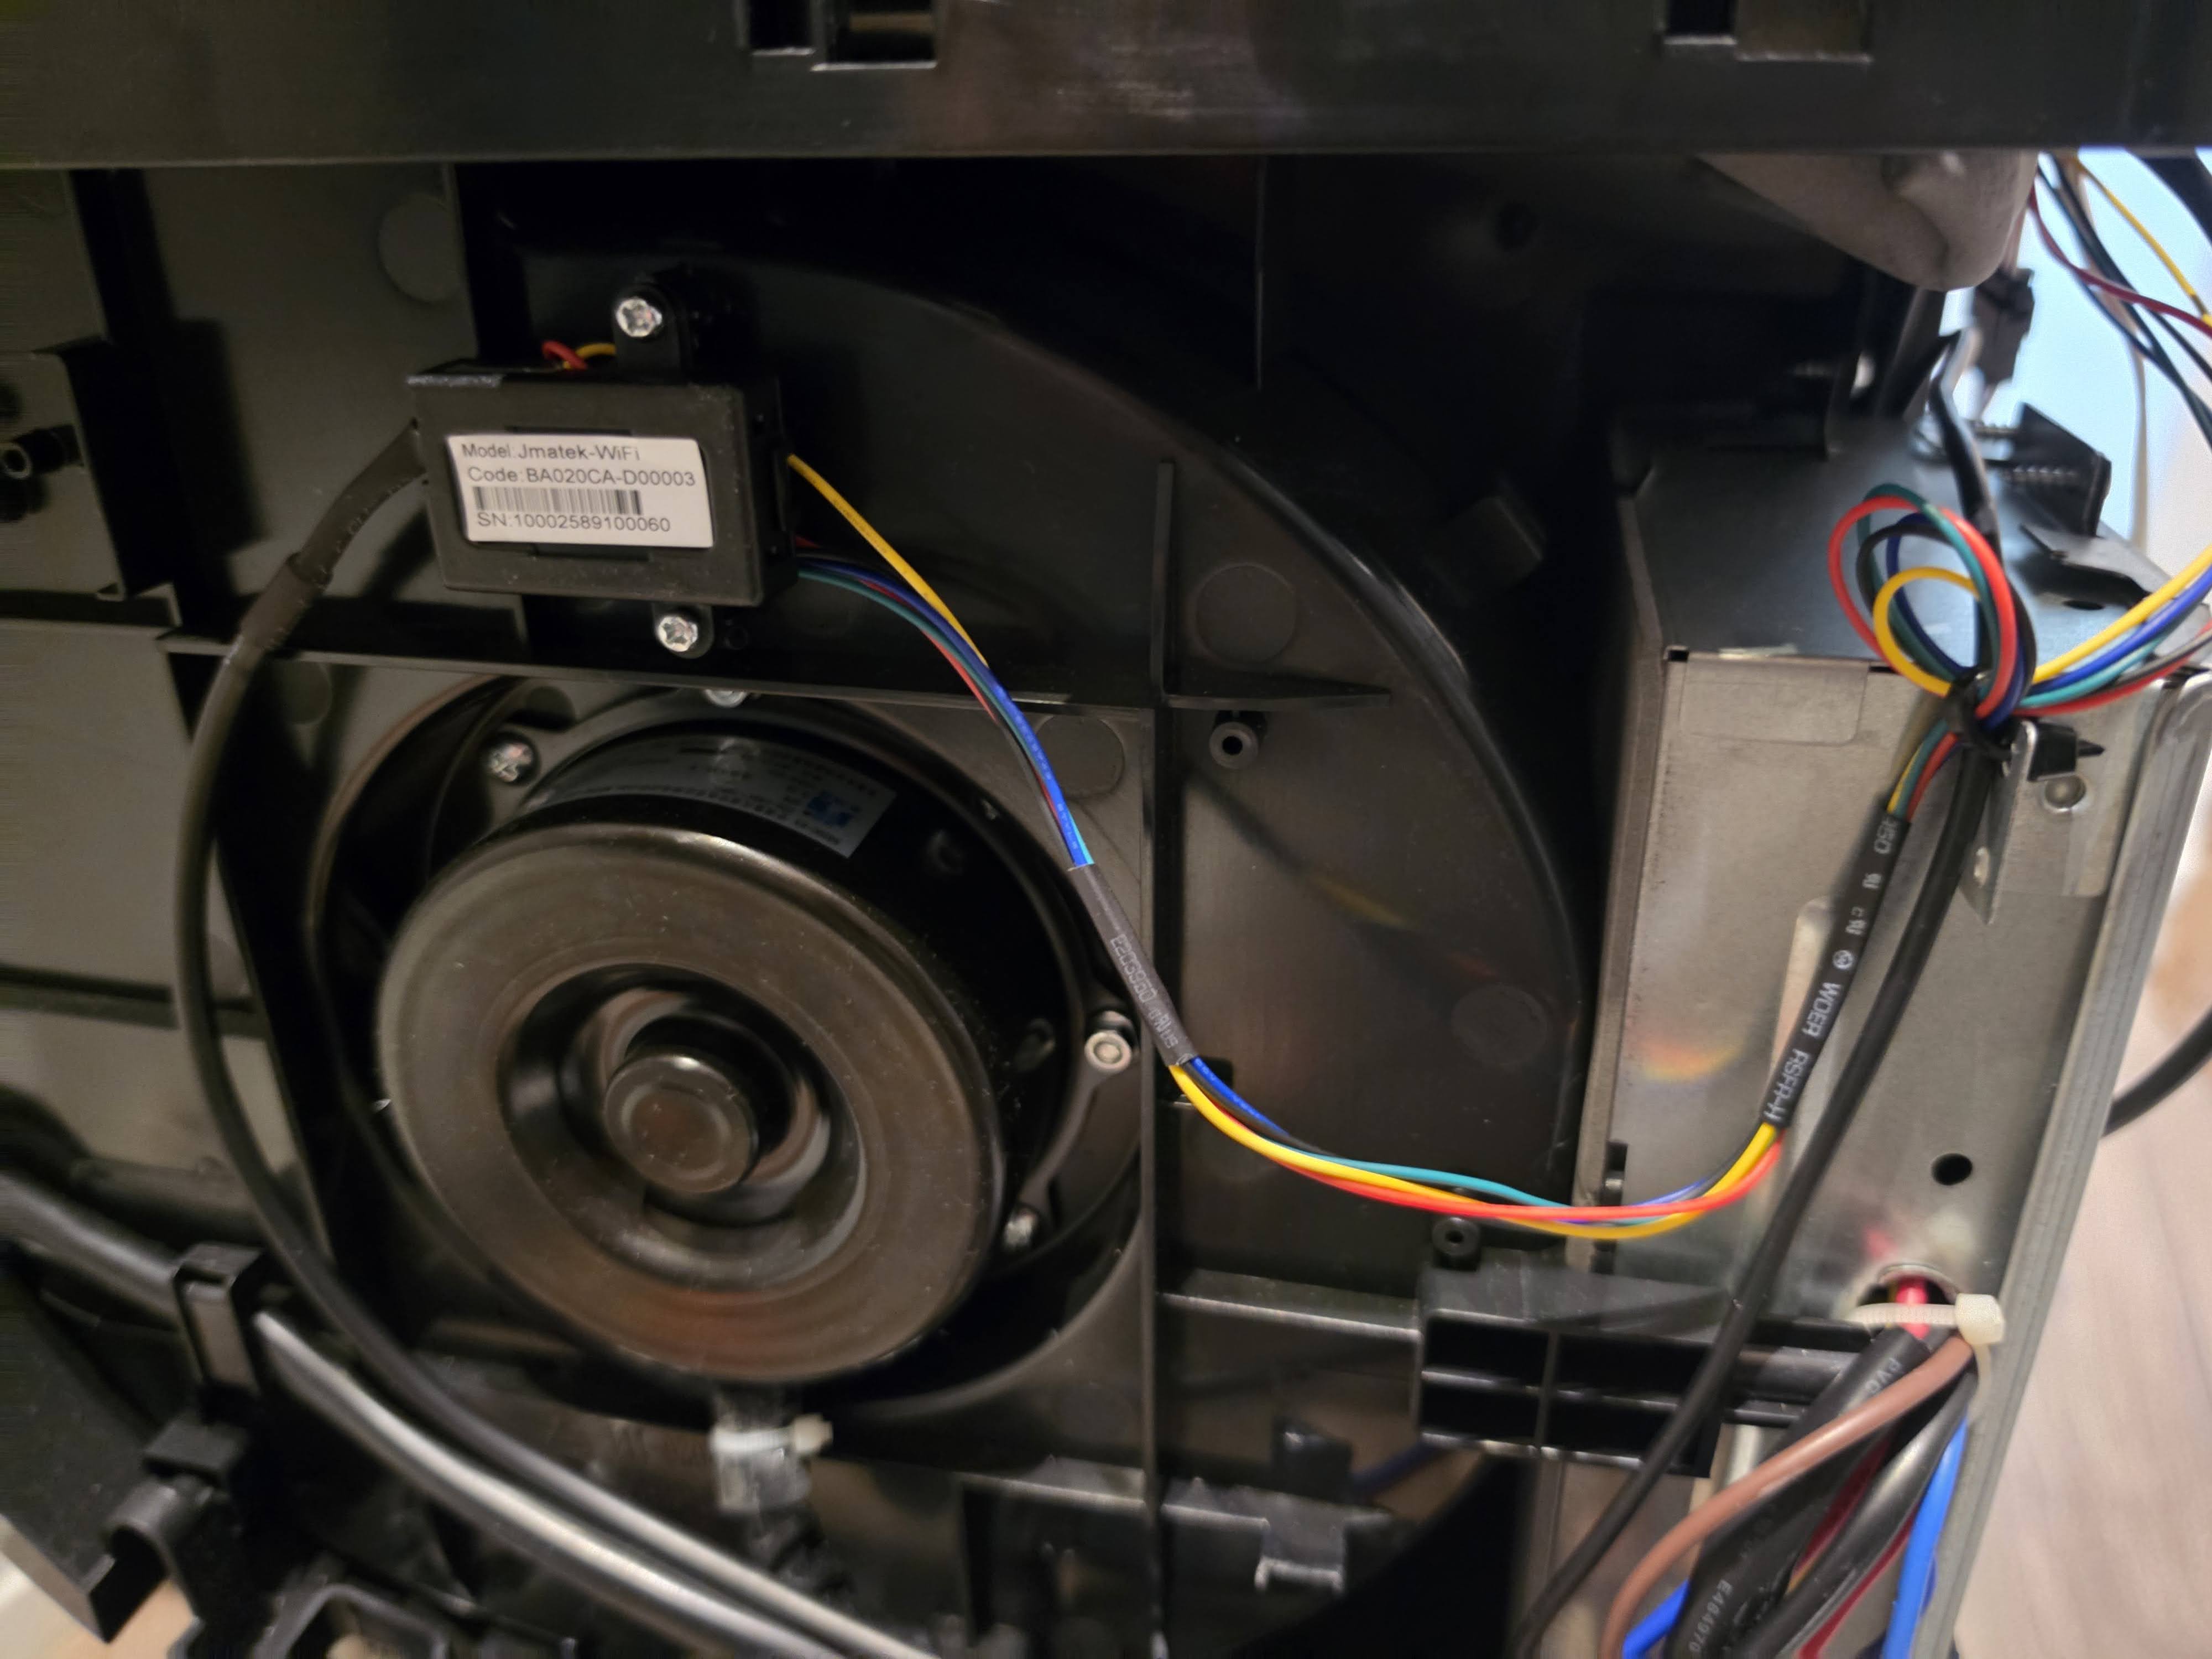
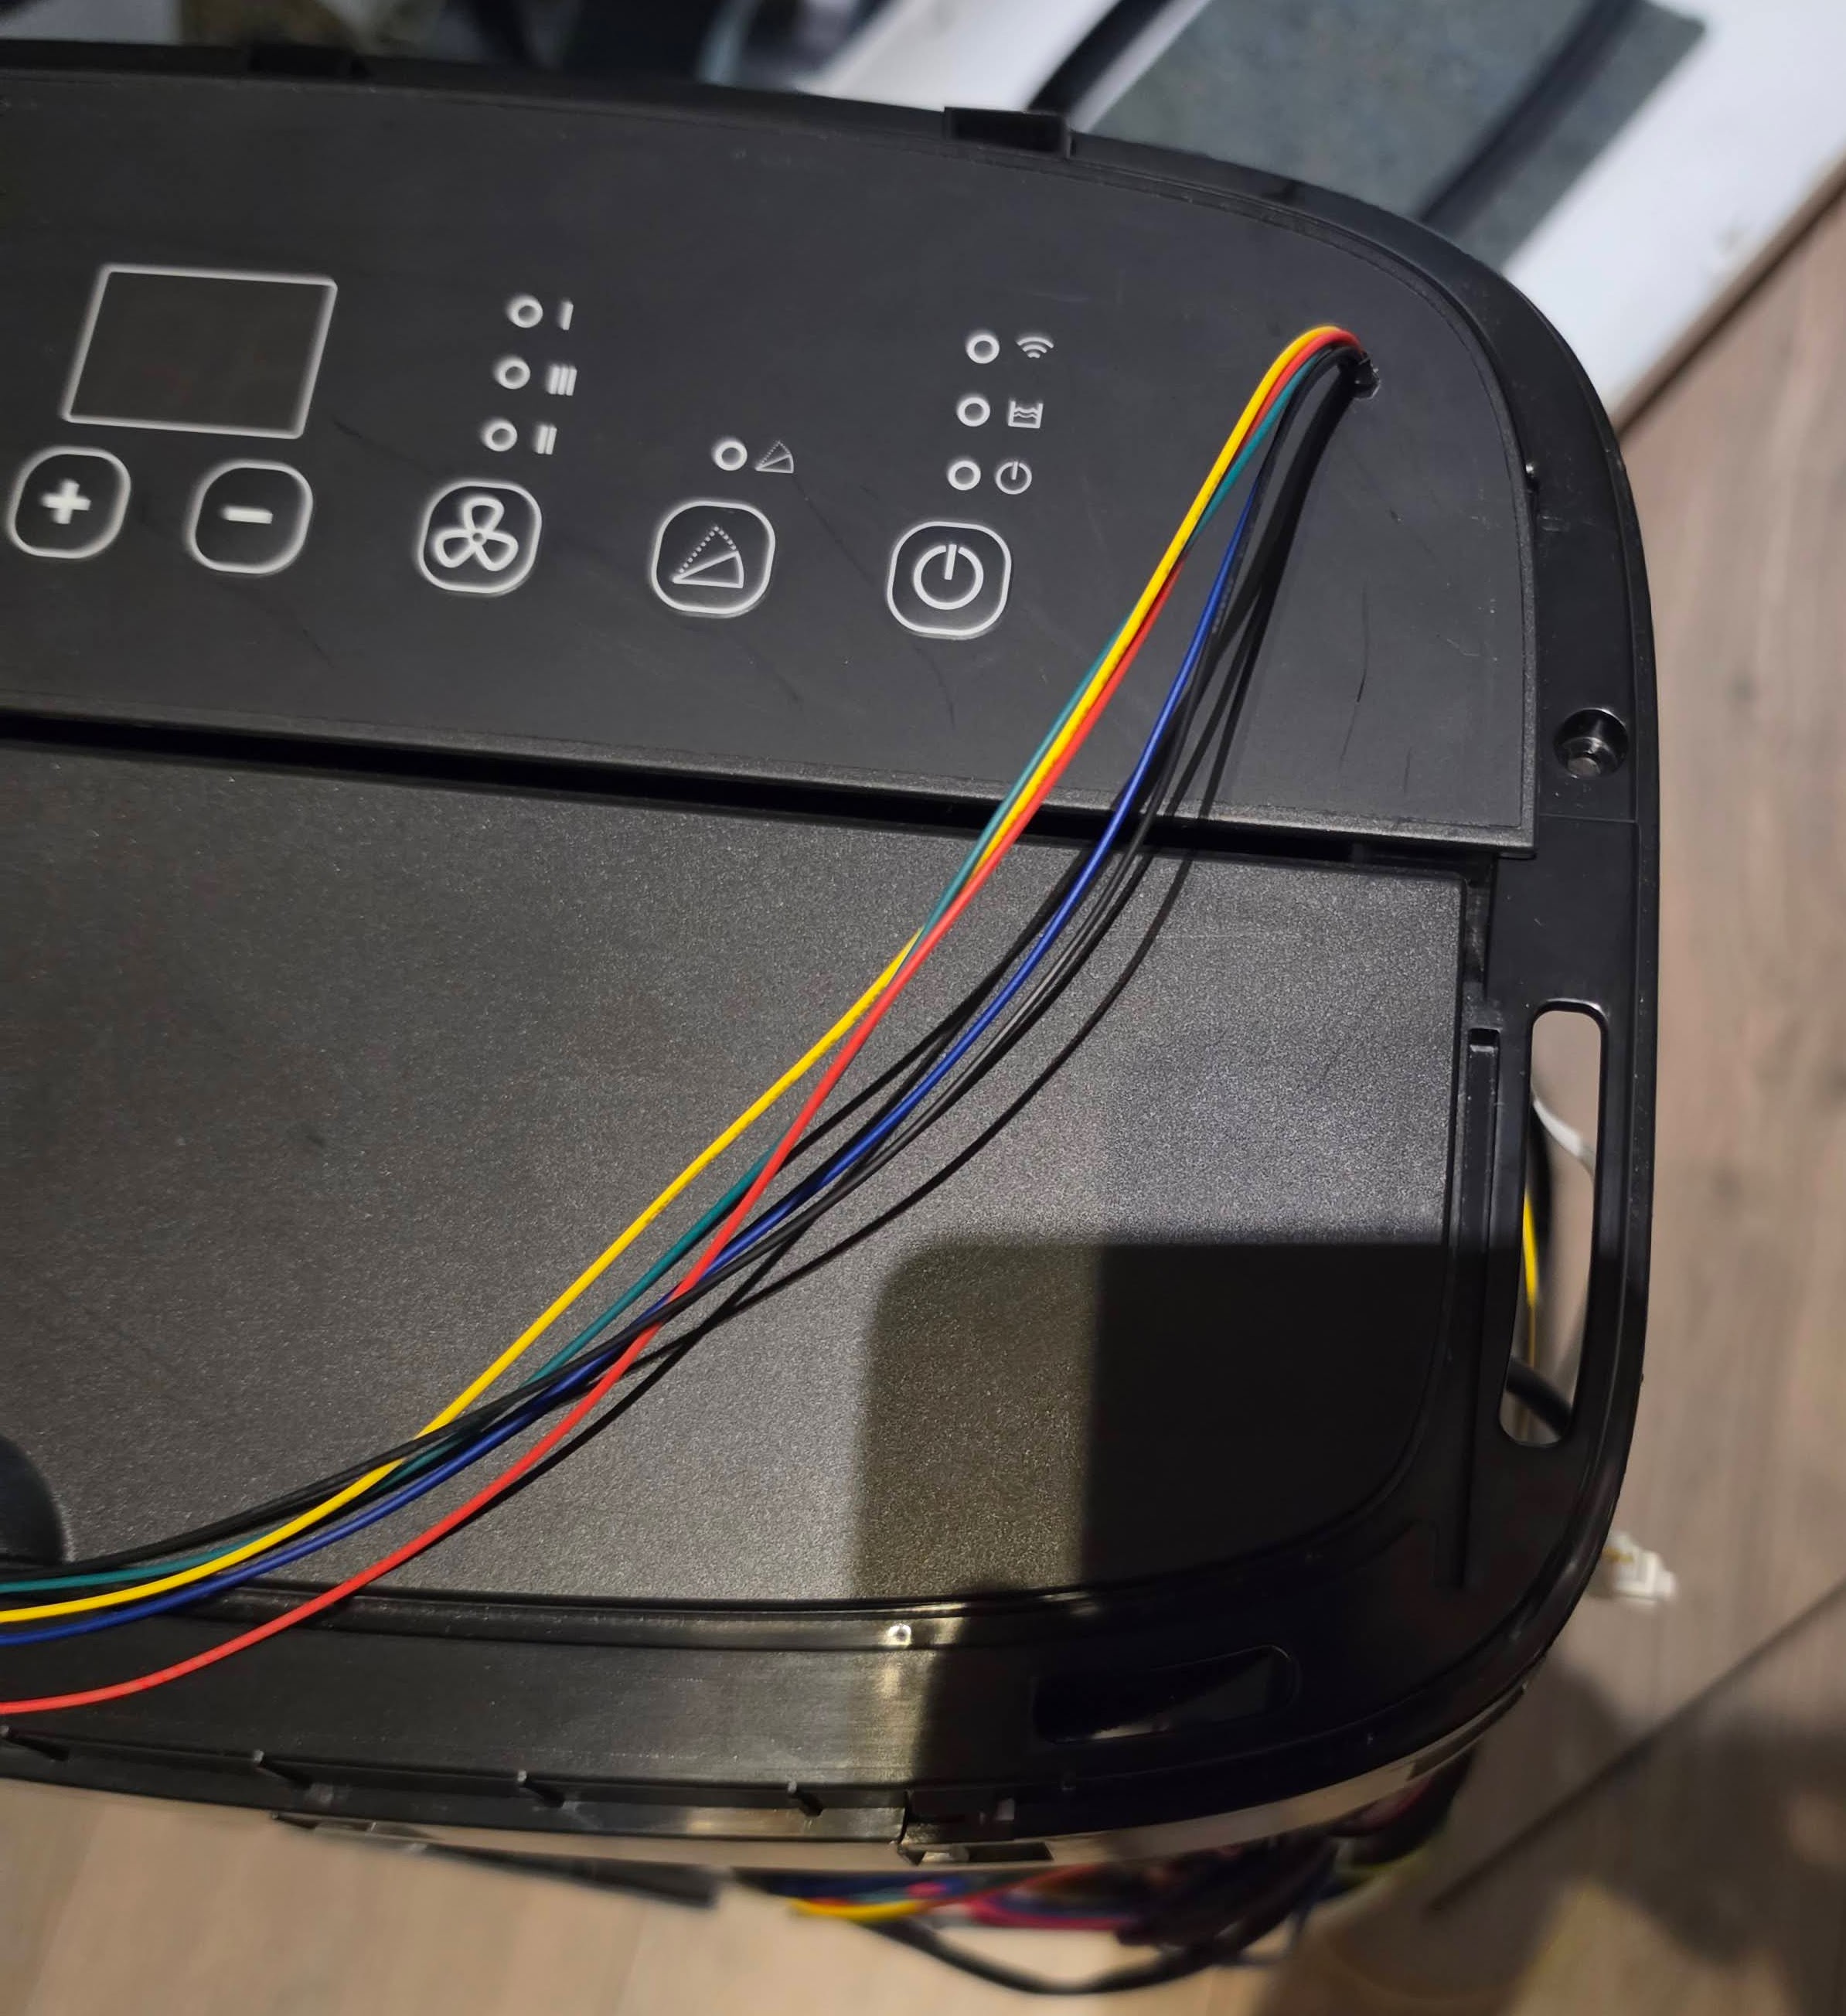
And here it is routed out through the top, ready to plug into whenever I need it:
Next I connected the IO0 line to GND (which apparently puts the chip in a “flashing-firmware” mode) and plugged in the UART USB-Adapter in my PC. I decided to use the Tasmota web flashing tool (for which I did have to use chromium as firefox wouldn’t detect the USB device) and selected the latest stable firmware. During the flashing process I just left the IO0 line connected, and only once finished I disconnected that line (and unplugged / replugged the USB Adapter to power cycle the Wifi Module) to get it to boot normally; and.. success!
In the Tasmota configuration I set Configuration > Configure Template > “Based on” to Tuya MCU (54), and configured the GPIO pins to Tuya TX/RX and Serial TX/RX in many different ways, but could never get the communication between my Wifi Module and the AC MCU working unfortunately.
I couldn’t figure out why nothing was coming across the serial connection, so I figured AI might be able to make some sense of it; some prompting in Claude later and I’d learned that if there’s not a successful handshake between the Wifi-Module and MCU, no data gets sent across the serial connection at all.
Then after digging around some more I learned from a different forum post (unfortunately do not recall which URL that was) that some manufacturers change the MCU protocol of their devices, and so the default handshake that Tuya MCU was attempting to do would never work.
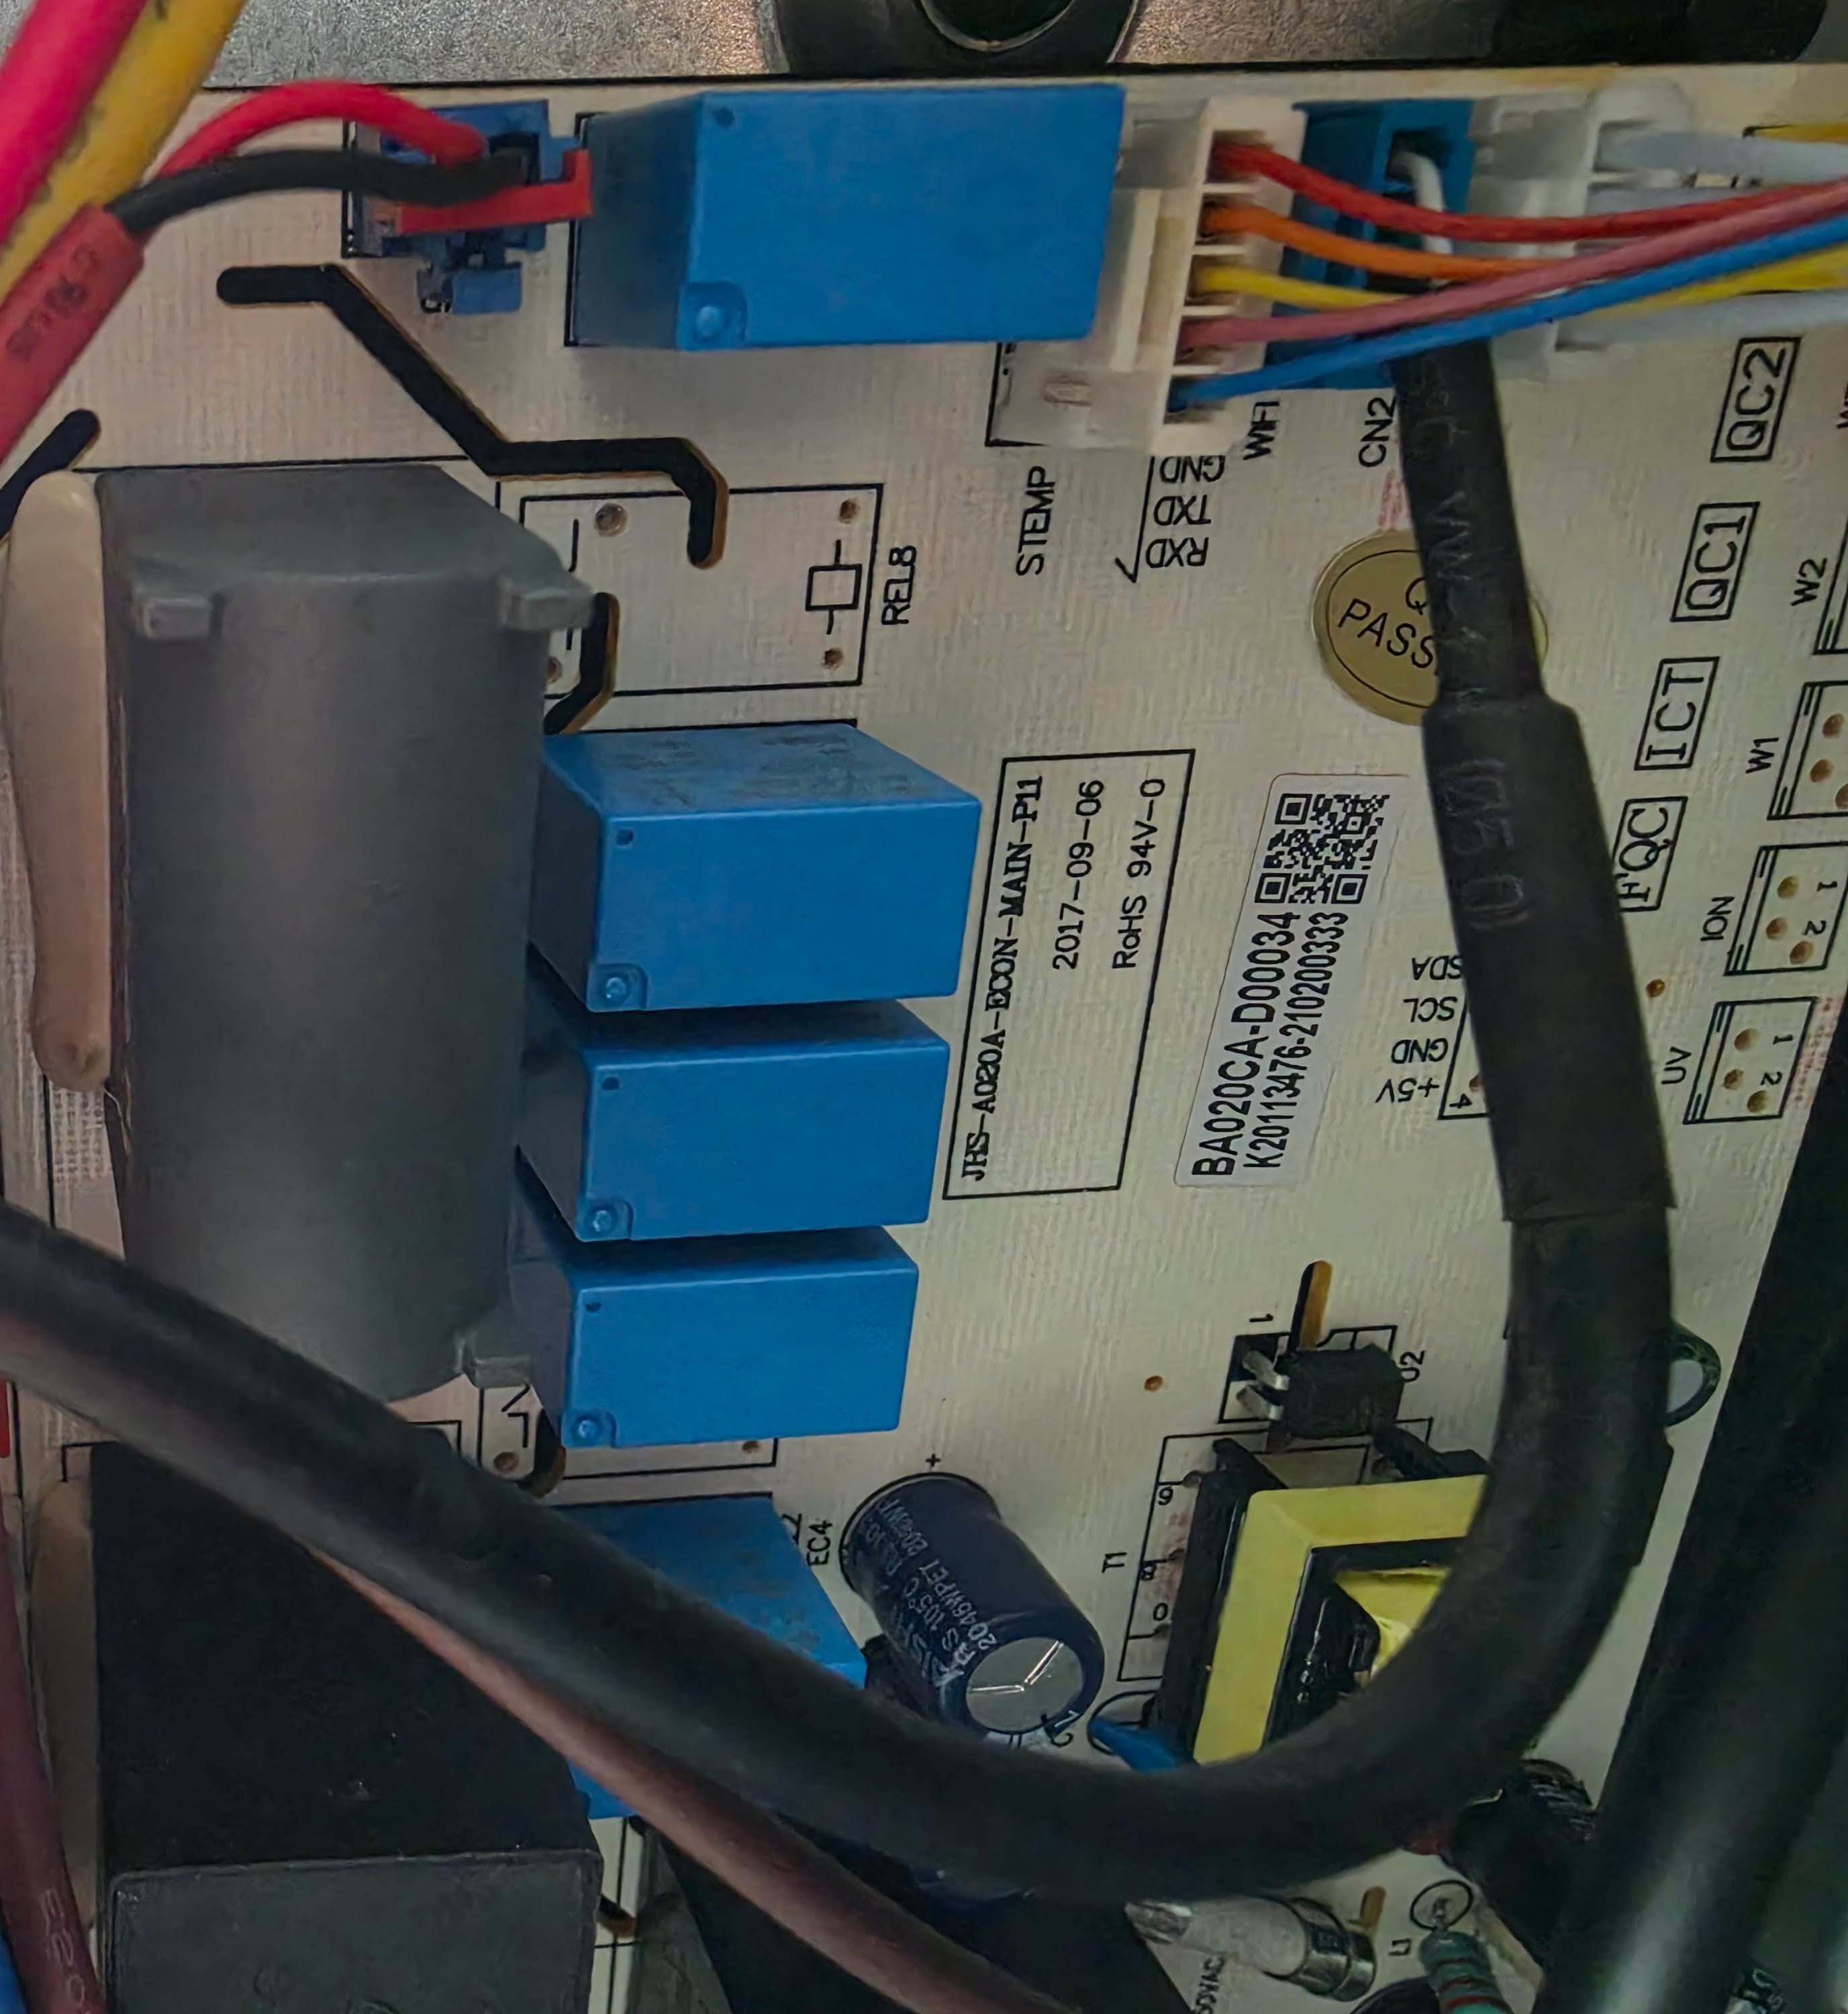
Getting more and more interested I decided to open up my AC even more, hoping to find out more about what kind of board was inside my AC that the Wifi module was attempting to communicate with. On the main circuit board I saw the label “JHS”, which I coincidentally also noticed on the Wifi module. So I googled for “JHS AC” and found a Portable AC unit that looked remarkably similar to mine, along with a home-assistant forum post saying these units are whitelabeled by other brands.
At this point I’m going to admit that I felt a bit stupid as a consumer. I purchased the Honeywell AC in the mindset that it seemed a reputable brand and that it’d be worth its money; now sure, it does cool my apartment, but it’s certainly not performing miracles. Only to now learn that pretty much the entire unit and software is all whitelabeled, that genuinely damages my trust in that brand and I’ll certainly be avoiding it from now on.
Regardless; at the same time I finally felt like I was starting to have a breakthrough. Especially when that same forum post had a link to this very helpful repository by SNMetamorph which had already done a lot of the work.
And so I looked up a guide on how to get ESPHome onto my wifi module:
- I installed ESPHome Device Builder in home-assistant
- I went to the WebUI and got greeted by a message that I needed HTTPS on my HA installation, something I’d been postponing as I’m not sure how I want to connect over the internet yet, so a quick acme-challenge using DNS01 later I had HTTPS set up on my HA installation and could continue.
- In the menu asking me how I’d like to create my configuration I went for “New Device Setup”
- I set the name to “honeywell-ac”, and the wifi to my IoT wifi AP
- I selected ESP8266 as the device type
- At every “Install” prompt I clicked “Skip” instead, since I needed to change some settings first
Now a new ESPHome device named “honeywell-ac” shows up in the UI, I clicked “edit” and added:
uart:
  tx_pin: GPIO15
  rx_pin: GPIO13
  baud_rate: 9600
  data_bits: 8
  parity: NONE
  stop_bits: 1

external_components:
  - source: github://SNMetamorph/esphome-jhs-ac-component@master
    components: [ jhs_ac ]
    refresh: 0s

climate:
  - platform: jhs_ac
    name: "HJ14CESVWK"
    protocol_version: 1
    supported_modes:
      - COOL
      - DRY
      - FAN_ONLY
    supported_fan_modes:
      - LOW
      - MEDIUM
      - HIGH
    supported_swing_modes:
      - VERTICAL
    water_tank_status:
      name: Water Tank Status
I tried installing this after connecting my Serial USB, but kept getting errors, eventually showing me this:
collect2: error: ld returned 1 exit status
*** [.pioenvs/honeywell-ac/firmware.elf] Error 1
A quick google later told me to click “clean all files” in the ESPHome dashboard, so I did that and tried again
After waiting on a screen that said “Preparing installation” for an eternity it eventually started installing (would be nice if the message showed that it’s actually compiling something, rather than looking like it just got stuck)
Now I disconnected the Serial USB from my PC, plugged in the AC and waited.. and it got the status “online” in the ESPHome dashboard! When I went to the home-assistant dashboard it now showed this device as a discovered device, so I added it and it immediately worked! I could finally control my AC straight from Home Assistant!